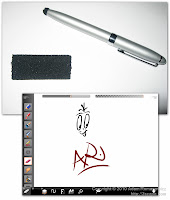
So I bought an iPad last week, largely to use as an e-reader. Of course, there are countless uses for the iPad, and one app I purchased was ArtStudio. This is a great app for drawing or painting on the iPad. However, I quickly realized that drawing with a finger is just not natural, nor do you have very good control. The solution? A conductive stylus! I started looking around, and found that you can purchase one for $10-$15. However, being frugal I figured I can make my own… The tip is basically conductive foam, like the kind used to protect the pins on electronic chips (IC’s). Being an electronics geek, I had plenty of this stuff around. All I had to do was house it in something. For this to work, you need a conductive surface from your hand to the foam – an old metal pen works perfectly. Stuff some foam into the pen, trim the end, and presto! You have yourself a stylus. And when the foam rubs off, just stuff in some more, for pennies! If you don’t have any metal pens, check out this tutorial. (Also works for iPad2 and iPad3)